Procedure 1 Blood Type Matching Practice
Holbox
Mar 15, 2025 · 7 min read
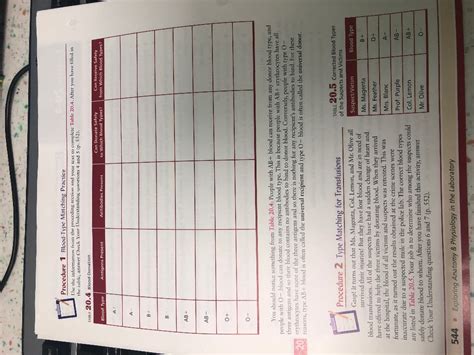
Table of Contents
Procedure 1: Blood Type Matching Practice: A Comprehensive Guide
Blood type matching is a critical procedure in healthcare, ensuring the safe transfusion of blood products. Improper matching can lead to severe, even fatal, reactions. This comprehensive guide details Procedure 1, a foundational practice for understanding and performing accurate blood type matching. We’ll cover the theoretical background, step-by-step procedure, interpretation of results, potential sources of error, and safety precautions.
Understanding Blood Groups and Antibodies
Before diving into the procedure, let's review the fundamental concepts of blood groups. The ABO blood group system is the most important in transfusion medicine, categorized into four main types: A, B, AB, and O. These types are determined by the presence or absence of specific antigens (A and B antigens) on the surface of red blood cells. The plasma also contains antibodies that react with the antigens not present on the individual's red blood cells.
- Type A: Has A antigens on red blood cells and anti-B antibodies in the plasma.
- Type B: Has B antigens on red blood cells and anti-A antibodies in the plasma.
- Type AB: Has both A and B antigens on red blood cells and neither anti-A nor anti-B antibodies in the plasma. This is the universal recipient.
- Type O: Has neither A nor B antigens on red blood cells and both anti-A and anti-B antibodies in the plasma. This is the universal donor.
The Rh factor is another crucial component. Individuals are either Rh-positive (Rh+) or Rh-negative (Rh-). Rh-negative individuals lack the Rh D antigen on their red blood cells and can develop anti-Rh antibodies if exposed to Rh-positive blood.
Understanding this antigen-antibody relationship is crucial for avoiding adverse reactions during transfusions. Transfusing incompatible blood types can trigger a serious immune response, leading to agglutination (clumping of red blood cells) and hemolysis (destruction of red blood cells).
Materials Required for Procedure 1 Blood Type Matching Practice
Before commencing the procedure, ensure you have all the necessary materials readily available. This ensures efficiency and minimizes the risk of contamination or errors. The list includes:
- Blood samples: Ideally, use simulated blood samples for practice to avoid any risks associated with handling real human blood. These are readily available from medical supply companies.
- Anti-A serum: A reagent containing antibodies against A antigens.
- Anti-B serum: A reagent containing antibodies against B antigens.
- Anti-Rh (D) serum: A reagent containing antibodies against Rh D antigen.
- Test tubes: Clean, labeled test tubes are essential for separating samples and reagents.
- Micropipettes or Pasteur pipettes: For accurate and controlled dispensing of reagents.
- Mixing sticks or vortex mixer: To thoroughly mix the blood and serum.
- Slides: Clean microscope slides for performing the slide test (optional, but helpful for quick visualization).
- White background: A white tile or paper is helpful for observing agglutination.
- Gloves: Always wear gloves to maintain hygiene and prevent contamination.
Step-by-Step Procedure for Blood Type Matching Practice
This section details the procedure, emphasizing accuracy and safety. Remember, this is a practice exercise; always follow established protocols and safety guidelines when working with real blood samples in a clinical setting.
Step 1: Sample Preparation
- Ensure the simulated blood samples are properly labeled and identified. Record the sample identification number for traceability.
- Using a clean micropipette, transfer a small amount (typically 1-2 drops) of each simulated blood sample into separate, labeled test tubes.
Step 2: Adding Reagents
- Add one drop of Anti-A serum to one test tube containing the blood sample.
- Add one drop of Anti-B serum to another test tube containing the same blood sample.
- Add one drop of Anti-Rh (D) serum to a third test tube containing the same blood sample.
- Ensure to use a different pipette for each reagent to prevent cross-contamination.
Step 3: Mixing and Incubation
- Gently mix the contents of each test tube using a clean mixing stick or by gently swirling the tube. Avoid vigorous shaking which can cause false-positive results.
- Allow the mixtures to sit undisturbed for approximately 1-2 minutes (or as per the manufacturer's instructions on the reagents). This allows sufficient time for agglutination to occur.
Step 4: Observation and Interpretation
- Carefully observe each tube against a white background. Look for agglutination—the clumping of red blood cells. Agglutination appears as small clumps or aggregates of red blood cells.
- Interpretation:
- Agglutination with Anti-A: Indicates the presence of A antigens, suggesting blood type A or AB.
- Agglutination with Anti-B: Indicates the presence of B antigens, suggesting blood type B or AB.
- Agglutination with Anti-Rh (D): Indicates the presence of Rh D antigen, suggesting Rh-positive blood.
- No agglutination: Absence of agglutination indicates the absence of the corresponding antigen.
Step 5: Recording Results
- Meticulously record your observations. Use a table or chart to clearly indicate the sample identification number, the reagent used, and whether agglutination occurred (positive) or not (negative). A clear and concise record-keeping system is essential for accurate interpretation and traceability.
Alternative Slide Method:
While the test tube method is preferred for better observation, a slide test can also be performed. Place a small drop of blood sample on a clean slide next to a small drop of each reagent (Anti-A, Anti-B, and Anti-Rh(D)). Gently mix each using a separate stick. Observe immediately and record the results. Agglutination appears as clumping immediately. This method is faster but requires more practice to accurately interpret the results.
Potential Sources of Error and Safety Precautions
Even in practice, accuracy is paramount. Here are potential pitfalls and safety measures:
- Improper mixing: Insufficient mixing can lead to false-negative results.
- Contamination: Cross-contamination of reagents or samples can yield inaccurate results. Use separate pipettes for each reagent and always maintain a sterile environment.
- Incorrect incubation time: Too short or too long incubation periods can affect the results. Adhere to the manufacturer's instructions strictly.
- Improper reading of results: Subtle agglutination might be missed if not observed carefully against a white background. Proper lighting is crucial.
- Expiring reagents: Using outdated reagents will result in inaccurate or unreliable results. Always check the expiry date before starting the procedure.
- Cold agglutinins: Some individuals possess cold agglutinins (antibodies that react at lower temperatures). To minimize this, the blood sample and reagents should be at room temperature.
- Working with human blood (in clinical setting): Always follow universal precautions and safety guidelines when handling real human blood to prevent exposure to bloodborne pathogens. Dispose of all materials safely according to your institution's protocols. Treat all blood and body fluids as potentially infectious.
Advanced Blood Typing Techniques and Considerations
While Procedure 1 provides a fundamental understanding of blood type matching, several more sophisticated techniques exist in clinical settings:
- Gel card testing: Uses a gel matrix to separate agglutinated cells from unagglutinated cells, providing clearer and more objective results.
- Microplate techniques: Miniaturize the process, requiring less sample volume and reagents.
- Automated blood typing systems: Utilizes advanced technology for high-throughput, automated blood typing and crossmatching. These systems provide fast, reliable, and objective results, minimizing human error.
These advanced techniques improve accuracy, efficiency, and safety in blood transfusion services. However, understanding the foundational Procedure 1 is essential for grasping the underlying principles of blood type matching.
Conclusion
Procedure 1: Blood type matching practice provides a crucial foundation for understanding the principles of blood typing and the importance of accurate blood matching. Mastering this procedure is vital for anyone working in transfusion medicine or any field involving blood sample analysis. Remember that consistent attention to detail, meticulous record-keeping, and adherence to safety protocols are paramount to ensuring accurate results and minimizing the risk of errors. This practice guide aims to equip you with the knowledge and skills necessary to confidently perform blood type matching, laying the groundwork for further advanced studies in immunohematology and transfusion medicine. Always remember to consult and adhere to established protocols and guidelines specific to your institution and regulatory framework when working with human blood.
Latest Posts
Latest Posts
-
What Is The Value Of I
Mar 17, 2025
-
The Accounts In The Ledger Of Monroe Entertainment Co
Mar 17, 2025
-
A Process Cost Accounting System Is Most Appropriate When
Mar 17, 2025
-
An Example Of A Breach Of Ephi Is
Mar 17, 2025
-
What Is Involved In Safety Monitoring
Mar 17, 2025
Related Post
Thank you for visiting our website which covers about Procedure 1 Blood Type Matching Practice . We hope the information provided has been useful to you. Feel free to contact us if you have any questions or need further assistance. See you next time and don't miss to bookmark.
