Draw A Circuit Diagram For The Circuit Of Figure 1
Holbox
Mar 18, 2025 · 5 min read
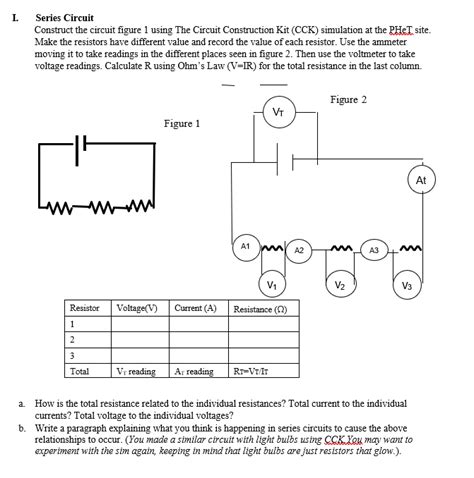
Table of Contents
Drawing a Circuit Diagram for Figure 1: A Comprehensive Guide
This article provides a detailed explanation of how to draw a circuit diagram, specifically focusing on creating a diagram for a hypothetical "Figure 1" (as the actual Figure 1 is not provided). We will cover fundamental circuit diagram principles, common components, symbols, and best practices. We'll also delve into advanced considerations for more complex circuits. This guide assumes a basic understanding of electrical circuits; however, even beginners can benefit from the clear explanations and visual aids.
Understanding Circuit Diagrams
A circuit diagram, also known as a schematic, is a simplified representation of an electrical circuit. It uses standardized symbols to depict the components and their interconnections. Unlike a physical layout drawing, a schematic prioritizes functionality and clarity over the physical arrangement of components. This makes it much easier to understand the circuit's operation and troubleshoot potential problems.
Essential Components and Their Symbols
Before we can draw our circuit diagram for Figure 1 (which we will assume is a relatively simple circuit for this explanation), let's review some key components and their corresponding symbols:
-
Voltage Source (Battery): Represented by a long and a short parallel line. The longer line indicates the positive terminal.
+ ---| |--- -
-
Resistor: Represented by a zig-zag line. The value of the resistance (in ohms) is usually written next to the symbol.
---/\/\/\---(with a value like "100Ω" written nearby)
-
Capacitor: Represented by two parallel lines, sometimes with a small curved line indicating the polarity for electrolytic capacitors.
---||---(or---|-|---for a polarized capacitor)
-
Inductor: Represented by a coil.
---{ }---
-
Switch: Represented by a break in the line, often with a movable contact. Different types of switches have slightly different symbols.
---( )---(a simple SPST switch)
-
Ground: Represented by a triangle or a ground symbol.
---GND---or---┴---
-
Diode: Represented by a triangle with a line across one edge, indicating the direction of current flow.
---|>---
-
Transistor (NPN): Represented by a triangle with an emitter, base, and collector leads. The NPN type has an arrow pointing outwards. PNP transistors have an arrow pointing inwards.
- (See image searches for NPN and PNP transistor symbols for better visualization.)
-
Operational Amplifier (Op-Amp): Represented by a triangle with two input leads (+) and (-) and one output lead.
- (See image searches for op-amp symbols for visualization.)
-
Integrated Circuit (IC): Represented by a rectangular box with pins numbered. A specific IC's functionality is usually indicated near the box.
Drawing the Circuit Diagram: A Step-by-Step Approach (for a Hypothetical Figure 1)
Let's assume "Figure 1" depicts a simple series circuit containing a battery, two resistors, and a light bulb. This allows us to demonstrate the basic principles of creating a circuit diagram.
Step 1: Identify Components
We have:
- One 9V battery
- One 100Ω resistor
- One 220Ω resistor
- One light bulb (modeled as a resistor, let's say 15Ω)
Step 2: Choose Symbols
Select the appropriate symbols from the list above for each component.
Step 3: Arrange Components Logically
A series circuit implies that the components are connected one after the other in a single loop. Start by drawing the battery symbol. Then, connect the positive terminal of the battery to one end of the 100Ω resistor, followed by the 220Ω resistor, the light bulb, and finally back to the negative terminal of the battery.
Step 4: Add Connections
Use straight lines to connect the components. Ensure that the connections are clear and unambiguous. Avoid crossing lines unnecessarily – use jump wires (indicated by arcs or small curves) to maintain a neat and organized diagram.
Step 5: Label Components and Values
Clearly label each component with its value (e.g., "100Ω," "220Ω," "15Ω"). Also, label the voltage source (e.g., "9V").
Step 6: Add a Title
Give the diagram a clear title, such as "Circuit Diagram for Figure 1 – Simple Series Circuit."
Example of the Hypothetical Figure 1 Circuit Diagram (Textual Representation):
+-----------------+
|                 |
|      9V         |
|                 |
+---+-------------+
     |
     |
   ----/\/\/\----  (100Ω)
     |
     |
   ----/\/\/\----  (220Ω)
     |
     |
   ----/\/\/\----  (15Ω - Light Bulb)
     |
     |
    ---GND---
(Note: This is a simplified textual representation. A proper diagram would use the standard symbols mentioned earlier and should be created using diagramming software or drawn neatly by hand.)
Advanced Considerations for Complex Circuit Diagrams
For more intricate circuits involving parallel branches, integrated circuits, or multiple voltage sources, additional considerations are needed:
-
Parallel Branches: Clearly indicate the parallel branches using appropriate connections. Each branch should have its own complete path back to the common point.
-
Integrated Circuits (ICs): Include the IC's part number and clearly label its pins according to the datasheet.
-
Multiple Voltage Sources: Show each voltage source with its proper polarity and indicate if there are any connections between the sources.
-
Grounding: Use consistent grounding symbols and clearly indicate ground connections for all components that require them.
-
Signal Flow: For digital circuits, consider indicating the direction of signal flow using arrows or other visual cues.
-
Diagramming Software: For complex circuits, it is highly recommended to use specialized electronic circuit design software (such as Eagle, KiCad, or Fritzing). These programs offer automatic component placement, wire routing, and other features that simplify the design process significantly.
Best Practices for Creating Clear and Effective Circuit Diagrams
-
Use Standardized Symbols: Adhere to established symbols to avoid ambiguity.
-
Maintain Clear Spacing: Provide enough space between components to enhance readability.
-
Use Straight Lines: Connect components using straight lines as much as possible.
-
Label All Components: Clearly label all components and their values.
-
Use Appropriate Scale: Choose a scale that ensures all components are clearly visible and the diagram is not too cluttered.
-
Organize the Diagram: Arrange components in a logical and organized manner.
-
Check for Errors: Thoroughly review the diagram for any errors or inconsistencies before finalizing it.
Conclusion
Creating a clear and accurate circuit diagram is crucial for understanding, designing, and troubleshooting electrical circuits. By following the principles and best practices outlined in this guide, you can effectively represent even complex circuits, ensuring clarity, accuracy, and ease of understanding for yourself and others. Remember that using appropriate diagramming software can drastically enhance the process, especially for complex projects. The step-by-step approach and explanation of components provided here lay a strong foundation for drawing circuit diagrams for any circuit, even if it is as complex as a "Figure 1" involving advanced components and topologies. Remember to always consult relevant datasheets and documentation for specific components and their detailed specifications.
Latest Posts
Latest Posts
-
The Best Known Self Regulatory Group Is The Blank
Mar 18, 2025
-
Your Local Movie Theater Uses The Same Group Pricing Strategy
Mar 18, 2025
-
A Set Of Bivariate Data Was Used To Create
Mar 18, 2025
-
What Is The Product Of This Reaction
Mar 18, 2025
-
Record The Entry To Close The Dividends Account
Mar 18, 2025
Related Post
Thank you for visiting our website which covers about Draw A Circuit Diagram For The Circuit Of Figure 1 . We hope the information provided has been useful to you. Feel free to contact us if you have any questions or need further assistance. See you next time and don't miss to bookmark.
