Drag Each Label To The Location Of Each Structure Described.
Holbox
Mar 26, 2025 · 8 min read
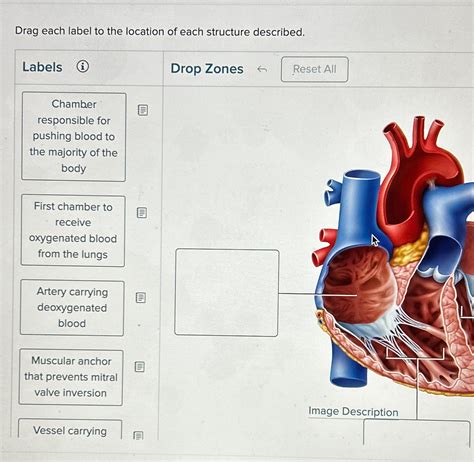
Table of Contents
- Drag Each Label To The Location Of Each Structure Described.
- Table of Contents
- Mastering Anatomy: A Drag-and-Drop Guide to Human Body Structures
- Skeletal System: Bone by Bone
- The Skull
- Vertebral Column
- Thoracic Cage
- Appendicular Skeleton: Limbs and Girdle
- Pectoral Girdle
- Upper Limb
- Pelvic Girdle
- Lower Limb
- Muscular System: The Powerhouses
- Head and Neck Muscles
- Muscles of the Trunk
- Muscles of the Upper Limb
- Muscles of the Lower Limb
- Nervous System: The Control Center
- Latest Posts
- Latest Posts
- Related Post
Mastering Anatomy: A Drag-and-Drop Guide to Human Body Structures
Understanding human anatomy is a cornerstone of many fields, from medicine and physical therapy to fitness and art. This interactive guide will help you master the location of key anatomical structures through a drag-and-drop exercise (though I can't create an actual interactive drag-and-drop element here, the text will guide you as if you were doing the exercise). This article will focus on key structures and regions of the human body, providing detailed descriptions to aid your learning. Remember, accuracy is key! Let's begin!
Skeletal System: Bone by Bone
This section will focus on major bones. Imagine you have a virtual skeleton in front of you, and you need to place the labels accurately. Let's start with the axial skeleton (the bones forming the central axis of the body):
The Skull
-
Cranium: Drag the "Cranium" label to the bony structure encasing the brain. This includes the frontal, parietal, temporal, occipital, sphenoid, and ethmoid bones. Feel the top of your head – that's the cranium!
-
Mandible: Drag the "Mandible" label to the lower jawbone. This is the only movable bone in the skull. Try moving your jaw – you’re feeling the mandible in action!
-
Maxilla: Drag the "Maxilla" label to the upper jawbone. This forms the upper part of your mouth, housing the upper teeth.
-
Zygomatic Bones (Cheekbones): Drag the "Zygomatic Bones" label to the prominent bones that form the cheekbones and part of the eye sockets. Feel them just below your eyes.
Vertebral Column
-
Cervical Vertebrae: Drag the "Cervical Vertebrae" label to the seven vertebrae in your neck. These are the most mobile vertebrae, allowing you to turn and nod your head.
-
Thoracic Vertebrae: Drag the "Thoracic Vertebrae" label to the twelve vertebrae in your chest. These vertebrae articulate with your ribs.
-
Lumbar Vertebrae: Drag the "Lumbar Vertebrae" label to the five vertebrae in your lower back. These bear the majority of your upper body weight.
-
Sacrum: Drag the "Sacrum" label to the triangular bone at the base of the spine, formed by the fusion of five sacral vertebrae.
-
Coccyx: Drag the "Coccyx" label (also known as the tailbone) to the small, bony structure at the very end of the spine.
Thoracic Cage
-
Ribs: Drag the "Ribs" label to the twelve pairs of curved bones protecting your heart and lungs. Note that they are connected to the thoracic vertebrae.
-
Sternum (Breastbone): Drag the "Sternum" label to the flat, elongated bone in the center of your chest. It connects to the ribs, forming the front part of the thoracic cage.
Appendicular Skeleton: Limbs and Girdle
Now let's tackle the appendicular skeleton (bones of the limbs and girdles):
Pectoral Girdle
-
Clavicle (Collarbone): Drag the "Clavicle" label to the long, S-shaped bone connecting the sternum to the scapula. Feel your collarbone – that's it!
-
Scapula (Shoulder Blade): Drag the "Scapula" label to the flat, triangular bone on the back of your rib cage. Feel the flat bone on your back – that is your scapula.
Upper Limb
-
Humerus: Drag the "Humerus" label to the long bone in your upper arm. It’s the bone between your shoulder and elbow.
-
Radius: Drag the "Radius" label to the bone on the thumb side of your forearm. Pronate and supinate your forearm (rotate your wrist) to feel the radius moving.
-
Ulna: Drag the "Ulna" label to the bone on the pinky finger side of your forearm. It articulates with the humerus at the elbow.
-
Carpals: Drag the "Carpals" label to the eight small bones forming your wrist.
-
Metacarpals: Drag the "Metacarpals" label to the five long bones forming the palm of your hand.
-
Phalanges: Drag the "Phalanges" label to the fourteen bones forming your fingers (three in each finger except the thumb, which has two).
Pelvic Girdle
-
Ilium: Drag the "Ilium" label to the large, flaring portion of the hip bone. This is the upper, broadest part of the hip bone. You can feel it on the side of your pelvis.
-
Ischium: Drag the "Ischium" label to the lower, posterior portion of the hip bone. This is the part you sit on.
-
Pubis: Drag the "Pubis" label to the anterior portion of the hip bone. This forms the front part of the pelvic girdle.
Lower Limb
-
Femur: Drag the "Femur" label to the longest and strongest bone in your body – the thigh bone. This is located between your hip and knee.
-
Patella (Kneecap): Drag the "Patella" label to the small, triangular bone in front of your knee joint. You can feel it easily.
-
Tibia (Shinbone): Drag the "Tibia" label to the larger, weight-bearing bone in your lower leg. This is the bone you can feel just below your knee on the front of your shin.
-
Fibula: Drag the "Fibula" label to the smaller, slender bone in your lower leg, located laterally (to the outside) of the tibia.
-
Tarsals: Drag the "Tarsals" label to the seven bones forming your ankle.
-
Metatarsals: Drag the "Metatarsals" label to the five long bones forming the sole of your foot.
-
Phalanges: Drag the "Phalanges" label to the fourteen bones forming your toes (three in each toe except the big toe, which has two).
Muscular System: The Powerhouses
Now, let's move on to the muscles. Again, imagine you're placing labels onto a diagram of the human body:
Head and Neck Muscles
-
Masseter: Drag the "Masseter" label to the muscle responsible for closing your jaw. You can feel this muscle working when you chew.
-
Sternocleidomastoid: Drag the "Sternocleidomastoid" label to the large muscle on each side of your neck. These muscles help flex, extend, and rotate your head.
-
Temporalis: Drag the "Temporalis" label to the muscle located on the side of your head above your ear. This muscle also assists in closing your jaw.
Muscles of the Trunk
-
Diaphragm: Drag the "Diaphragm" label to the dome-shaped muscle separating your chest cavity from your abdominal cavity. This is the primary muscle of respiration.
-
Rectus Abdominis: Drag the "Rectus Abdominis" label to the "six-pack" muscles located in the front of your abdomen.
-
External Obliques: Drag the "External Obliques" label to the muscles located on the sides of your abdomen. These muscles help rotate your trunk.
-
Internal Obliques: Drag the "Internal Obliques" label to the muscles located deep to the external obliques. These also assist in trunk rotation.
-
Transverse Abdominis: Drag the "Transverse Abdominis" label to the deepest abdominal muscle, responsible for compressing the abdomen.
Muscles of the Upper Limb
-
Biceps Brachii: Drag the "Biceps Brachii" label to the muscle on the front of your upper arm. This muscle flexes your elbow.
-
Triceps Brachii: Drag the "Triceps Brachii" label to the muscle on the back of your upper arm. This muscle extends your elbow.
-
Deltoid: Drag the "Deltoid" label to the muscle forming the rounded contour of your shoulder. This muscle abducts your arm (raises it to the side).
-
Pectoralis Major: Drag the "Pectoralis Major" label to the large, fan-shaped muscle covering your upper chest. This muscle adducts and internally rotates your arm.
-
Latissimus Dorsi: Drag the "Latissimus Dorsi" label to the large, flat muscle covering much of your back. This muscle extends, adducts, and internally rotates your arm.
Muscles of the Lower Limb
-
Gluteus Maximus: Drag the "Gluteus Maximus" label to the largest muscle in your body, located in your buttocks. This muscle extends your hip.
-
Quadriceps Femoris (Rectus Femoris, Vastus Lateralis, Vastus Medialis, Vastus Intermedius): Drag the "Quadriceps Femoris" label to the group of four muscles on the front of your thigh. These muscles extend your knee.
-
Hamstrings (Biceps Femoris, Semitendinosus, Semimembranosus): Drag the "Hamstrings" label to the group of three muscles on the back of your thigh. These muscles flex your knee.
-
Gastrocnemius: Drag the "Gastrocnemius" label to the muscle forming the bulk of your calf. This muscle plantarflexes your foot (points your toes).
-
Soleus: Drag the "Soleus" label to the muscle located deep to the gastrocnemius in your calf. This muscle also plantarflexes your foot.
Nervous System: The Control Center
The nervous system is incredibly complex, but we can focus on some major structures:
-
Brain: Drag the "Brain" label to the organ inside your skull, responsible for controlling your thoughts, emotions, and bodily functions.
-
Spinal Cord: Drag the "Spinal Cord" label to the long, cylindrical structure extending from the brain down the vertebral column. This transmits signals between the brain and the rest of the body.
-
Peripheral Nerves: Drag the "Peripheral Nerves" label to the network of nerves branching out from the spinal cord, reaching all parts of the body.
This detailed guide provides a solid foundation for understanding the location of major human body structures. Remember, consistent practice and review are crucial for mastering anatomy. While the drag-and-drop aspect is simulated here, the detailed descriptions should help you visualize and accurately place these labels in your mind. Use anatomical atlases and other resources to further enhance your understanding. Good luck, and happy studying!
Latest Posts
Latest Posts
-
Active Genes In Eukaryotic Cells Are Associated With
Mar 30, 2025
-
Classify Each Random Variable As Discrete Or Continuous
Mar 30, 2025
-
The Optimal Temperature For Most Human Pathogens Ranges From
Mar 30, 2025
-
Write The Vector Shown Above In Component Form
Mar 30, 2025
-
Best Buy Uses The Lower Of Cost Or Net
Mar 30, 2025
Related Post
Thank you for visiting our website which covers about Drag Each Label To The Location Of Each Structure Described. . We hope the information provided has been useful to you. Feel free to contact us if you have any questions or need further assistance. See you next time and don't miss to bookmark.
