For The Solutions That You Will Prepare In Step 2
Holbox
Mar 21, 2025 · 6 min read
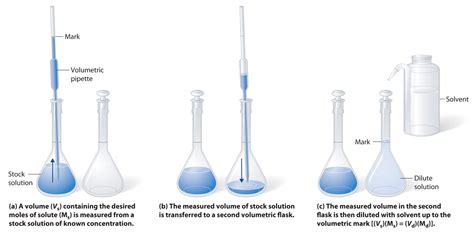
Table of Contents
Detailed Guide to Solution Preparation: A Comprehensive Overview for Step 2 Procedures
This article delves into the intricacies of solution preparation, focusing specifically on the crucial steps involved in Step 2 of various procedures. We'll cover best practices, common pitfalls to avoid, and advanced techniques for achieving precise and reliable results. The importance of accuracy in solution preparation cannot be overstated; it directly impacts the success and reproducibility of experiments, analyses, and processes across numerous scientific disciplines.
H2: Understanding the Importance of Step 2 Solution Preparation
Step 2, often involving the meticulous preparation of solutions, acts as the cornerstone for many experimental methodologies. Whether you're performing a titration, preparing a reagent for a chemical reaction, cultivating cells in a specific medium, or conducting a complex biochemical assay, the quality of your solutions dictates the reliability and accuracy of your results. Inaccurate solution preparation can lead to:
- Erroneous Results: Incorrect concentrations directly affect measurements and interpretations.
- Wasted Resources: Repeating experiments due to flawed solutions leads to time and material waste.
- Inconclusive Data: Inconsistent solution preparation creates unreliable data, hindering scientific progress.
- Safety Hazards: Incorrectly prepared solutions, particularly those involving hazardous chemicals, pose safety risks.
H2: Essential Equipment and Materials for Accurate Solution Preparation
Before delving into the specifics of solution preparation, it's crucial to ensure you have the appropriate tools and materials at your disposal. These include:
-
Analytical Balance: An analytical balance is essential for accurately weighing out solid materials, ensuring precise measurements to the milligram level or better. Proper calibration is vital for accurate results.
-
Volumetric Flasks: These flasks, designed to contain a precise volume, are crucial for preparing solutions of known concentrations. Choose flasks of the appropriate size for your desired volume.
-
Graduated Cylinders and Pipettes: These tools facilitate the accurate measurement and transfer of liquids. Graduated cylinders are useful for approximate measurements, while pipettes, especially micropipettes, offer greater precision for smaller volumes.
-
Beakers and Erlenmeyer Flasks: These provide containers for mixing and dissolving substances.
-
Stirring Rods and Magnetic Stir Plates: These tools ensure efficient mixing and dissolution of solutes. Magnetic stir plates offer hands-free stirring.
-
Funnels: Funnels aid in the transfer of solids and liquids, minimizing spills and ensuring clean transfers.
-
Distilled or Deionized Water: Using purified water is crucial to avoid introducing impurities that could affect the solution's properties.
-
Appropriate Personal Protective Equipment (PPE): Gloves, lab coats, and safety goggles are essential for protecting yourself from potential hazards associated with chemicals.
H2: Step-by-Step Guide to Solution Preparation Techniques
The specifics of Step 2 solution preparation depend heavily on the context of the larger procedure. However, several core principles remain consistent across various applications. We will outline a general procedure, emphasizing the critical steps and offering guidance on common issues.
H3: Calculating the Required Mass or Volume of Solute
The first critical step involves accurately calculating the required mass or volume of solute needed to achieve the desired concentration. This typically involves using the following formula:
- Molarity (M) = moles of solute / liters of solution
This formula allows you to determine the necessary amount of solute (in moles) based on your desired molarity and the final volume of the solution. You will then need to convert moles to grams using the molar mass of the solute. For solutions prepared by diluting stock solutions, you would use a dilution formula:
- M1V1 = M2V2
Where M1 and V1 represent the concentration and volume of the stock solution, and M2 and V2 represent the concentration and volume of the diluted solution.
H3: Weighing the Solute
Accurately weighing the solute is crucial. Use an analytical balance, ensuring it is properly calibrated and tared (zeroed) before weighing. Record the exact mass of the solute to several decimal places, depending on the required precision. Handle solids carefully to avoid spills or contamination.
H3: Dissolving the Solute
Add the weighed solute to an appropriate solvent (usually distilled or deionized water). Stir gently to facilitate dissolution. For some substances, heating might be necessary (always check for compatibility), but avoid excessive heating that could affect the solution's properties or cause decomposition.
H3: Transferring to a Volumetric Flask
Once the solute is completely dissolved, carefully transfer the solution to a volumetric flask of the appropriate size. Use a funnel to minimize spills and ensure quantitative transfer. Rinse the original container with small portions of solvent and add these rinsings to the flask to ensure all the solute is transferred.
H3: Filling to the Mark
Carefully add solvent to the flask until the bottom of the meniscus (the curved surface of the liquid) aligns with the graduation mark on the neck of the flask. Use a dropper or pipette for precise final additions.
H3: Mixing Thoroughly
Once the flask is filled to the mark, securely stopper the flask and invert it several times to ensure thorough mixing. This guarantees a uniform concentration throughout the solution.
H3: Labeling and Storage
Properly label the solution with the name of the solute, concentration, date of preparation, and your initials or other identifier. Store the solution appropriately, following any specific storage instructions relevant to the solute and its properties.
H2: Advanced Techniques and Considerations
Several advanced techniques and considerations can enhance the accuracy and reproducibility of solution preparation:
-
Using Standard Solutions: For precise work, using certified standard solutions, which have known concentrations verified by a reputable authority, is recommended.
-
Serial Dilutions: For preparing solutions of very low concentrations, serial dilutions are often more accurate and efficient than attempting to directly weigh out a very small amount of solute.
-
Temperature Control: Temperature can affect the volume and density of solutions. For highly accurate work, consider temperature control during preparation and measurement.
-
Vacuum Filtration: For solutions containing particulate matter, vacuum filtration can be used to remove the particles and ensure a clear solution.
-
Quality Control: Periodic checks and validation of the prepared solutions using appropriate analytical techniques are crucial to ensure accuracy and consistency.
H2: Troubleshooting Common Issues in Solution Preparation
Several common problems can arise during solution preparation. Here are some troubleshooting tips:
-
Solute Doesn't Dissolve: Check for solubility issues. Consider using a different solvent, heating (carefully!), or using a sonicator to improve solubility.
-
Inaccurate Measurements: Ensure accurate weighing and volume measurements. Recalibrate your instruments if necessary.
-
Contamination: Use clean glassware and avoid introducing contaminants. Work in a clean environment.
-
Incorrect Calculations: Double-check your calculations and formulas to avoid errors.
-
Improper Mixing: Ensure thorough mixing to achieve uniform concentration.
H2: Safety Precautions in Solution Preparation
Safety is paramount in any laboratory setting, and solution preparation is no exception. Always:
- Wear appropriate PPE (gloves, lab coat, safety goggles).
- Work in a well-ventilated area.
- Handle hazardous chemicals with extreme care, following proper safety protocols.
- Dispose of waste materials properly, following established guidelines.
- Be aware of potential hazards associated with specific chemicals. Consult safety data sheets (SDS) for detailed information.
H2: Conclusion: Mastering the Art of Solution Preparation
Mastering the art of solution preparation is a fundamental skill for anyone working in a laboratory or undertaking scientific research. By understanding the underlying principles, employing appropriate techniques, and adhering to safety protocols, you can ensure the accuracy, reproducibility, and reliability of your experiments, leading to more meaningful and impactful results. Remember that attention to detail, meticulous execution, and a commitment to accuracy are key to successful solution preparation and a robust scientific process. Consistent practice and refinement of technique will elevate your proficiency and contribute significantly to the validity and credibility of your scientific endeavors.
Latest Posts
Latest Posts
-
Which Of The Following Best Characterizes Jit Systems
Mar 28, 2025
-
Identify Three Possible Components Of A Dna Nucleotide
Mar 28, 2025
-
Tubular Reabsorption And Tubular Secretion Differ In That
Mar 28, 2025
-
The Greater Is The Marginal Propensity To Consume The
Mar 28, 2025
Related Post
Thank you for visiting our website which covers about For The Solutions That You Will Prepare In Step 2 . We hope the information provided has been useful to you. Feel free to contact us if you have any questions or need further assistance. See you next time and don't miss to bookmark.
