Final Step To Installing A Floating Vinyl Floor
Holbox
Mar 21, 2025 · 6 min read
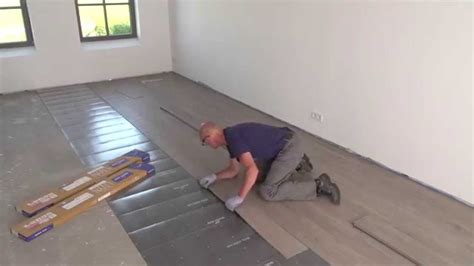
Table of Contents
- Final Step To Installing A Floating Vinyl Floor
- Table of Contents
- The Final Steps to a Perfect Floating Vinyl Floor Installation
- Pre-Installation Checks: A Final Walkthrough
- 1. Acclimation: Did you wait long enough?
- 2. Subfloor Assessment: One last look
- 3. Tools and Materials Check: Everything in its place
- Cleaning: The Foundation of a Flawless Finish
- 1. Thorough Sweeping and Vacuuming: Get rid of all loose debris
- 2. Damp Mopping: Eliminate fine dust
- 3. Final Inspection: Perfection is key
- Transitioning and Trimming: Seamless Integration
- 1. Measuring and Cutting: Precision is vital
- 2. Using Transition Strips and Molding: Achieving a smooth transition
- 3. Careful Installation of Molding: The finishing touch
- Expansion Gaps: Essential for Longevity
- 1. Maintaining the Correct Gap: Preventing problems
- 2. Addressing Gaps: Dealing with potential issues
- Final Inspection and Quality Control: Pride in your work
- 1. Visual Inspection: A keen eye for detail
- 2. Checking for Squeaks or Loose Planks: Addressing potential problems
- 3. Cleaning: The final polish
- Post-Installation Care and Maintenance: Protecting your investment
- 1. Avoiding Excessive Moisture: Prevention is key
- 2. Regular Cleaning: Maintaining a beautiful floor
- 3. Protecting Against Scratches and Abrasion: Proactive steps
- Conclusion: Enjoy Your Stunning New Floor!
- Latest Posts
- Latest Posts
- Related Post
The Final Steps to a Perfect Floating Vinyl Floor Installation
Installing a floating vinyl floor can transform your home, adding style, durability, and value. But the final steps are crucial for achieving a truly professional finish and ensuring the longevity of your new floor. This comprehensive guide details those critical final touches, from meticulous cleaning to adding finishing touches, guaranteeing your floating vinyl floor looks fantastic and lasts for years to come.
Pre-Installation Checks: A Final Walkthrough
Before even thinking about the final steps, take a moment for a thorough pre-installation check. This will save you potential headaches later.
1. Acclimation: Did you wait long enough?
Remember the acclimation period? It's vital that your vinyl planks have had sufficient time to adjust to the temperature and humidity of your room. Failure to do so can lead to expansion issues down the line. Double-check your manufacturer's instructions – they are your bible for this process. Insufficient acclimation is a major cause of problems.
2. Subfloor Assessment: One last look
Inspect your subfloor one last time. Are there any remaining debris, bumps, or unevenness? Even tiny imperfections can show through the vinyl. Address any issues now, before it's too late. A perfectly smooth subfloor is paramount for a seamless finished look.
3. Tools and Materials Check: Everything in its place
Gather all your necessary tools and materials. You'll likely need a broom, mop, damp cloths, quarter-round molding (or other transition pieces), and any adhesive for the molding. Having everything readily available ensures a smooth and efficient workflow.
Cleaning: The Foundation of a Flawless Finish
A spotless subfloor is the cornerstone of a professional-looking floating vinyl floor installation. Dirt, dust, or debris left behind can cause unevenness and potentially compromise the integrity of the installation.
1. Thorough Sweeping and Vacuuming: Get rid of all loose debris
Begin with a thorough sweeping to remove any large debris. Then, vacuum the entire floor meticulously, paying particular attention to corners and crevices. Use a vacuum with a hard floor attachment for optimal results. Don't skip this step! Even fine dust particles can interfere with the planks' adhesion and create an uneven surface.
2. Damp Mopping: Eliminate fine dust
Follow the vacuuming with a damp mop. Use clean water and wring the mop out thoroughly to prevent excess moisture from penetrating the subfloor. Avoid using cleaning solutions or excessive amounts of water. The goal is to remove any remaining dust, not to soak the floor.
3. Final Inspection: Perfection is key
After mopping, allow the floor to dry completely before proceeding. Once dry, perform a final visual inspection. If you spot any remaining debris, repeat the cleaning process until the subfloor is perfectly clean and dry. This meticulous cleaning will prevent future problems and contribute to a beautiful final result.
Transitioning and Trimming: Seamless Integration
Transitioning between different floor types and trimming the vinyl planks precisely are critical for a seamless and professional look. Pay close attention to detail in these steps.
1. Measuring and Cutting: Precision is vital
Accurate measurement and clean cutting are vital for creating a perfect fit around doorways, thresholds, and other features. Use a sharp utility knife and a straight edge for precise cuts. Don't rush this process! Inaccurate cuts will be immediately visible and detract from the overall aesthetic.
2. Using Transition Strips and Molding: Achieving a smooth transition
Employ transition strips or molding to create smooth transitions between your new vinyl flooring and existing flooring or different floor heights. These strips not only enhance the appearance but also help protect the edges of the vinyl flooring. Ensure that the transition strips are securely fastened and flush against both the vinyl and the adjacent flooring. Use the correct adhesive for your particular type of transition molding.
3. Careful Installation of Molding: The finishing touch
Once the vinyl flooring is completely installed, it’s time to install the quarter-round molding (or other preferred molding). This step hides expansion gaps and adds a polished, professional finish. Use a nail gun or adhesive, ensuring the molding is properly secured and level.
Expansion Gaps: Essential for Longevity
Maintaining proper expansion gaps is crucial for the long-term health of your floating vinyl floor. These gaps allow the floor to expand and contract with changes in temperature and humidity, preventing buckling, warping, and other issues.
1. Maintaining the Correct Gap: Preventing problems
Remember the expansion gaps you left around the perimeter of the room during installation? Double-check that they are still present and the correct size as specified by the manufacturer. These gaps are critical for allowing the vinyl to move naturally without causing damage.
2. Addressing Gaps: Dealing with potential issues
If you notice any inconsistencies in the expansion gaps, gently adjust the planks. If you've made a mistake, removing and reinstalling sections may be necessary. This is easier to correct before the molding is installed.
Final Inspection and Quality Control: Pride in your work
Before declaring your project complete, a final and thorough inspection is critical. This is your chance to catch any minor imperfections or issues before they become bigger problems.
1. Visual Inspection: A keen eye for detail
Walk across the entire floor, examining the planks closely for any gaps, unevenness, or damaged pieces. Look for inconsistencies in the color or pattern. Pay close attention to transitions and molding for proper alignment and secure attachment.
2. Checking for Squeaks or Loose Planks: Addressing potential problems
Carefully walk over the floor again, paying close attention to any squeaking or loose planks. Address any such issues immediately. This may involve gently tapping down loose planks or using adhesive as a final measure (always refer to manufacturer instructions).
3. Cleaning: The final polish
Once you’re satisfied with the installation, give your new floor a final clean. Use a suitable vinyl cleaner to remove any dust or debris accumulated during the installation process.
Post-Installation Care and Maintenance: Protecting your investment
Your new floating vinyl floor is an investment that deserves proper care and maintenance. Following these simple steps will ensure its longevity and beauty for years to come.
1. Avoiding Excessive Moisture: Prevention is key
Avoid excessive moisture on the floor. Immediately clean up any spills to prevent water damage. Use doormats at entrances to help keep dirt and moisture out.
2. Regular Cleaning: Maintaining a beautiful floor
Regular cleaning is key to maintaining the pristine condition of your new floor. Sweep or vacuum regularly to remove loose dirt and debris. Use a damp mop with a gentle vinyl-friendly cleaner as needed.
3. Protecting Against Scratches and Abrasion: Proactive steps
Use furniture pads under furniture legs to prevent scratches. Avoid dragging heavy objects across the floor. Regular maintenance is significantly less costly and less troublesome than major repairs.
Conclusion: Enjoy Your Stunning New Floor!
Installing a floating vinyl floor is a rewarding DIY project. By meticulously following these final steps, you can ensure a professional-looking, durable, and long-lasting floor that you'll enjoy for years to come. Remember, attention to detail in these final steps is what truly sets a good installation apart from a great one. Take your time, be thorough, and revel in the beauty of your newly transformed space!
Latest Posts
Latest Posts
-
A Company Sells 10000 Shares Of Previously
Mar 28, 2025
-
A 90 Day Note Issued On April 10 Matures On
Mar 28, 2025
-
Buying New Furniture For Your Home Would Increase
Mar 28, 2025
-
Your Boss Returns From A Business Trip
Mar 28, 2025
-
Which Of The Following Is True Of Blood Vessel Length
Mar 28, 2025
Related Post
Thank you for visiting our website which covers about Final Step To Installing A Floating Vinyl Floor . We hope the information provided has been useful to you. Feel free to contact us if you have any questions or need further assistance. See you next time and don't miss to bookmark.
