Art-labeling Activity Internal Midsagittal View Of The Skull
Holbox
Mar 29, 2025 · 6 min read
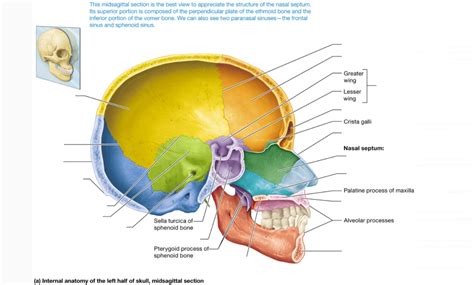
Table of Contents
- Art-labeling Activity Internal Midsagittal View Of The Skull
- Table of Contents
- Art-Labeling Activity: Internal Midsagittal View of the Skull
- Understanding the Internal Midsagittal View
- Major Structures to Label:
- Adding Depth and Nuance:
- Designing the Art-Labeling Activity:
- Enhancing Engagement and Learning:
- Example Activity: A Step-by-Step Guide
- Beyond the Activity: Expanding Learning
- Latest Posts
- Latest Posts
- Related Post
Art-Labeling Activity: Internal Midsagittal View of the Skull
The human skull, a complex and fascinating structure, provides a rich canvas for anatomical study. Creating an art-labeling activity focused on the internal midsagittal view of the skull offers a unique opportunity to blend artistic expression with detailed anatomical understanding. This activity is suitable for students of anatomy, art students interested in scientific illustration, or anyone fascinated by the intricacies of the human body. This comprehensive guide will delve into creating a compelling and educational art-labeling activity, incorporating best practices for clarity, accuracy, and engagement.
Understanding the Internal Midsagittal View
Before embarking on the art-labeling activity, a solid understanding of the internal midsagittal view of the skull is crucial. This view provides a precise, symmetrical representation of the skull's internal structures, showing the midline section. Key features to focus on include:
Major Structures to Label:
- Cranial Cavity: The large, hollow space that houses the brain. Emphasize its size and shape.
- Falx Cerebri: The sickle-shaped fold of dura mater that separates the cerebral hemispheres. Highlight its attachment points.
- Tentorium Cerebelli: The tent-like structure separating the cerebrum from the cerebellum. Show its relationship to the transverse sinus.
- Superior Sagittal Sinus: A venous channel running along the superior margin of the falx cerebri. Indicate its direction of blood flow.
- Inferior Sagittal Sinus: A smaller venous channel inferior to the superior sagittal sinus. Demonstrate its convergence with the great cerebral vein.
- Straight Sinus: Formed by the junction of the inferior sagittal sinus and the great cerebral vein. Show its location and connection to the transverse sinus.
- Transverse Sinus: A large venous channel running laterally across the inner surface of the occipital bone. Highlight its connection to the sigmoid sinus.
- Sigmoid Sinus: A continuation of the transverse sinus that leads to the internal jugular vein. Indicate its S-shaped course.
- Internal Jugular Foramen: The opening through which the internal jugular vein exits the skull. Clearly mark its location.
- Foramen Magnum: The large opening at the base of the skull through which the spinal cord passes. Emphasize its size and location.
- Clivus: The sloping surface of the sphenoid and occipital bones that supports the brainstem. Clearly delineate its boundaries.
- Sella Turcica: The saddle-shaped depression in the sphenoid bone that houses the pituitary gland. Show its prominent features.
- Hypophyseal Fossa: The small depression within the sella turcica that specifically houses the pituitary gland. This is often overlooked but crucial for accuracy.
- Optic Canals: The openings that transmit the optic nerves. Illustrate their position relative to the sella turcica.
- Superior Orbital Fissures: Openings that allow passage of cranial nerves and blood vessels to the orbit. Show their connection to the orbit.
- Internal Acoustic Meatus: Openings transmitting cranial nerves VII and VIII (facial and vestibulocochlear nerves). Show their location and relative position.
Adding Depth and Nuance:
To elevate the art-labeling activity beyond a simple labeling exercise, encourage students to explore additional details:
- Bone Sutures: Include the major sutures, such as the sagittal suture, lambdoid suture, and the squamous suture. This adds anatomical realism and reinforces bony landmarks.
- Blood Vessel Anatomy: Delve deeper into the venous system, illustrating the precise pathways and tributaries of the sinuses. This can be represented with subtle color variations to distinguish between different venous structures.
- Brain Regions (Optional): For more advanced students, incorporating simplified representations of major brain regions (cerebrum, cerebellum, brainstem) within the cranial cavity adds another layer of complexity and understanding.
Designing the Art-Labeling Activity:
The success of the activity hinges on thoughtful design. Here's a step-by-step approach:
-
Choose a Visual Medium: The choice of medium depends on the student's skill level and available resources. Options include:
- Printable Worksheet: A pre-printed image with blank labels provides a structured approach.
- Digital Drawing: Students can use digital art programs to create and label the midsagittal view. This provides greater flexibility and allows for layering and color variations.
- Hand-Drawn Illustration: Traditional drawing encourages observation skills and a deeper understanding of the structures.
-
Image Selection/Creation: The quality of the underlying image is critical. Ensure the image is clear, accurate, and large enough for detailed labeling. A high-resolution image is preferable. If using a digital medium, consider using a template to guide students' drawings and ensure anatomical accuracy.
-
Label Placement and Design: Strategically place labels to avoid overlapping structures. Use clear, concise labeling terminology, matching the anatomical nomenclature. A consistent font style and size enhances readability.
-
Difficulty Levels: Cater to different skill levels by offering varying levels of complexity. A simpler version might focus on major structures, while an advanced version includes finer details like smaller blood vessels or foramina.
-
Instructions and Guidelines: Provide clear and concise instructions. Specify what structures need to be labeled, include a word bank if necessary, and set a clear expectation for accuracy.
-
Assessment Criteria: Define clear assessment criteria to evaluate student work. Consider aspects like accuracy, clarity of labeling, neatness, and overall presentation.
Enhancing Engagement and Learning:
To maximize the educational impact, incorporate elements that go beyond simple labeling:
- Color-coding: Assign colors to different tissue types (bone, venous structures) for visual distinction.
- Interactive Elements: Incorporate interactive elements like drag-and-drop labeling or matching activities.
- 3D Models: Integrate 3D models of the skull to provide a more immersive experience.
Example Activity: A Step-by-Step Guide
Here's a possible art-labeling activity design for an intermediate level:
Title: Internal Midsagittal View of the Skull: An Art-Labeling Activity
Objective: To accurately identify and label the key anatomical structures of the internal midsagittal view of the human skull.
Materials:
- High-resolution image of the internal midsagittal view of the skull (printed or digital).
- Pencils, colored pencils, or digital art tools.
- Word bank (optional).
Procedure:
- Study the image: Carefully examine the provided image of the internal midsagittal view of the skull. Familiarize yourself with the major structures.
- Label the Structures: Using the provided word bank (or your anatomical knowledge), accurately label the following structures on the image: (list the structures from the "Major Structures to Label" section, selecting a subset appropriate for the intermediate level).
- Color-coding (optional): Use color to distinguish between different tissue types (bone – light beige; dura mater and sinuses - various shades of blue/purple).
- Review and refine: Check your work for accuracy and neatness.
Assessment:
- Accuracy of labeling (80%).
- Neatness and presentation (20%).
Word Bank (Example):
- Cranial Cavity
- Falx Cerebri
- Tentorium Cerebelli
- Superior Sagittal Sinus
- Foramen Magnum
- Sella Turcica
This example provides a structured framework. Adapt the complexity and content to suit the specific learning objectives and skill levels of your target audience.
Beyond the Activity: Expanding Learning
The art-labeling activity serves as a foundation for deeper exploration. Encourage students to:
- Research: Dive into the functions of each labeled structure.
- Comparison: Compare the internal midsagittal view with other skull views (lateral, superior).
- Clinical Correlation: Explore the clinical significance of the structures (e.g., fractures, hematomas).
- Further Illustration: Create additional illustrations showing the relationships between different structures, highlighting blood flow or nerve pathways.
By integrating artistic expression with accurate anatomical knowledge, this art-labeling activity fosters a deeper understanding of the intricate internal structure of the human skull. It transforms a potentially dry subject into an engaging and memorable learning experience. The use of varied mediums and levels of complexity ensures accessibility and caters to diverse learning styles, ultimately making this activity both educational and rewarding.
Latest Posts
Latest Posts
-
Overhead May Be Applied Based On
Apr 02, 2025
-
Knowledge Courage Patience And Honesty Are Examples Of
Apr 02, 2025
-
What Is The Function Of The Highlighted Organelle
Apr 02, 2025
-
Which Method Or Operator Can Be Used To Concatenate Lists
Apr 02, 2025
-
Which Of The Following Is Not A Component Ingredient Rok
Apr 02, 2025
Related Post
Thank you for visiting our website which covers about Art-labeling Activity Internal Midsagittal View Of The Skull . We hope the information provided has been useful to you. Feel free to contact us if you have any questions or need further assistance. See you next time and don't miss to bookmark.
