Identify The Stages Of Meiosis On The Diagram
Holbox
Mar 14, 2025 · 6 min read
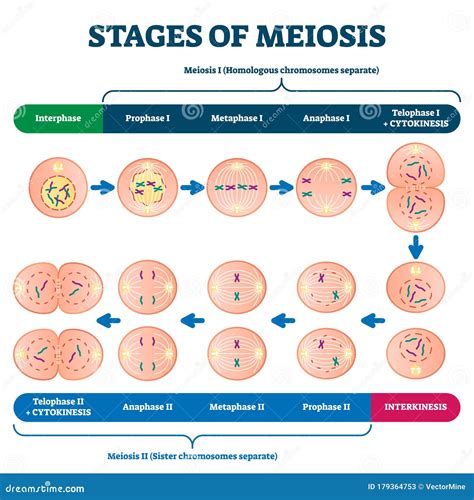
Table of Contents
Identifying the Stages of Meiosis on a Diagram: A Comprehensive Guide
Meiosis, the specialized type of cell division that produces gametes (sperm and egg cells), is a complex process involving two rounds of division: Meiosis I and Meiosis II. Understanding the distinct stages of each round is crucial for grasping the mechanisms of genetic inheritance and variation. This article provides a detailed guide to identifying the stages of meiosis on a diagram, explaining the key characteristics of each phase and offering tips for accurate identification.
Meiosis I: Reductional Division
Meiosis I is the reductional division, reducing the chromosome number from diploid (2n) to haploid (n). This is achieved through the separation of homologous chromosomes. Let's delve into the stages:
1. Prophase I: The Longest and Most Complex Phase
Key Characteristics:
- Chromatin Condensation: Chromatin fibers condense into visible chromosomes. This is a crucial step for visualization on a diagram. Look for distinct, elongated structures.
- Synapsis: Homologous chromosomes pair up, forming a structure called a tetrad or bivalent. This pairing is highly specific and crucial for crossing over. On a diagram, you'll see two very similar chromosomes closely associated.
- Crossing Over: Non-sister chromatids of homologous chromosomes exchange genetic material. This process creates genetic recombination, a major source of genetic variation. Look for points of physical connection (chiasmata) between non-sister chromatids on the diagram—these indicate crossing over events.
- Nuclear Envelope Breakdown: The nuclear envelope disintegrates, allowing the chromosomes to move freely within the cell. This is indicated by the absence of a defined nuclear membrane surrounding the chromosomes on the diagram.
- Spindle Fiber Formation: Spindle fibers, composed of microtubules, begin to form, extending from opposite poles of the cell. These fibers will be crucial for chromosome movement in later stages. On the diagram, these fibers appear as lines extending towards the chromosomes.
Identifying Prophase I on a Diagram: Look for paired homologous chromosomes (tetrads), evidence of crossing over (chiasmata), and the absence of a nuclear envelope. The chromosomes will be condensed but not yet aligned at the metaphase plate.
2. Metaphase I: Alignment at the Equator
Key Characteristics:
- Tetrads at the Metaphase Plate: The tetrads align at the metaphase plate, an imaginary plane equidistant from the two poles of the cell. This alignment is crucial for the accurate segregation of homologous chromosomes. On the diagram, all tetrads should be arranged at the center of the cell.
- Spindle Fiber Attachment: Spindle fibers attach to the kinetochores, protein structures located at the centromeres of each chromosome. Each homologous chromosome is attached to fibers from opposite poles. The attachments are clearly visible on a well-labeled diagram.
Identifying Metaphase I on a Diagram: Look for the precise alignment of tetrads along the metaphase plate and the attachment of spindle fibers to the centromeres of each homologous chromosome. The chromosomes are fully condensed.
3. Anaphase I: Separation of Homologous Chromosomes
Key Characteristics:
- Homologous Chromosome Separation: Homologous chromosomes separate and move towards opposite poles of the cell. This is the defining event of Anaphase I and significantly reduces the chromosome number. On a diagram, you'll see two chromosomes moving towards opposite ends of the cell. Notice that sister chromatids remain attached at the centromere.
- Sister Chromatids Remain Attached: Crucially, sister chromatids remain attached at the centromere; they don't separate at this stage. This differs significantly from Anaphase II.
Identifying Anaphase I on a Diagram: Observe the separation of homologous chromosomes, with sister chromatids still connected, moving towards opposite poles. The cell begins to elongate.
4. Telophase I and Cytokinesis: Two Haploid Cells
Key Characteristics:
- Chromosome Arrival at Poles: Homologous chromosomes arrive at opposite poles of the cell.
- Nuclear Envelope Reformation (Sometimes): In some cases, a nuclear envelope may reform around each set of chromosomes. The presence or absence of this should be apparent on the diagram.
- Cytokinesis: Cytokinesis, the division of the cytoplasm, occurs, resulting in two haploid daughter cells. The diagram should clearly show two separate cells. Each cell contains only one chromosome from each homologous pair.
Identifying Telophase I and Cytokinesis on a Diagram: Look for the presence of two separate cells, each with a haploid set of chromosomes. The chromosomes may or may not be decondensed, depending on the specific cell type and stage of the process depicted in the diagram.
Meiosis II: Equational Division
Meiosis II is the equational division, similar to mitosis, but with a haploid number of chromosomes. This division separates sister chromatids, resulting in four haploid daughter cells.
1. Prophase II: Preparing for Sister Chromatid Separation
Key Characteristics:
- Chromosome Condensation: Chromosomes condense again if they had decondensed during Telophase I.
- Spindle Fiber Formation: Spindle fibers begin to form, radiating from the poles of each cell.
- Nuclear Envelope Breakdown (If Present): The nuclear envelope breaks down (if it reformed during Telophase I).
Identifying Prophase II on a Diagram: Look for condensed chromosomes in each of the two haploid daughter cells from Meiosis I, spindle fibers forming, and the absence (or breakdown) of the nuclear envelope.
2. Metaphase II: Alignment at the Equator (Again)
Key Characteristics:
- Chromosomes at the Metaphase Plate: Individual chromosomes align at the metaphase plate of each cell. This alignment is crucial for the precise separation of sister chromatids.
- Spindle Fiber Attachment: Spindle fibers attach to the kinetochores of sister chromatids.
Identifying Metaphase II on a Diagram: Observe the alignment of individual chromosomes (not tetrads) at the metaphase plate of each cell, with spindle fibers attached to the kinetochores.
3. Anaphase II: Separation of Sister Chromatids
Key Characteristics:
- Sister Chromatid Separation: Sister chromatids finally separate and move towards opposite poles of each cell. This is the defining characteristic of Anaphase II, distinct from Anaphase I.
- Chromatid Movement: The separated sister chromatids (now considered individual chromosomes) move to opposite poles.
Identifying Anaphase II on a Diagram: Look for the separation of sister chromatids moving toward opposite poles in each cell. This results in a doubling of the number of chromosomes in each cell compared to Metaphase II.
4. Telophase II and Cytokinesis: Four Haploid Daughter Cells
Key Characteristics:
- Chromosome Arrival at Poles: Chromosomes arrive at the poles of each cell.
- Nuclear Envelope Reformation: A nuclear envelope reforms around each set of chromosomes.
- Cytokinesis: Cytokinesis occurs, resulting in four haploid daughter cells, each with a unique combination of genetic material.
Identifying Telophase II and Cytokinesis on a Diagram: Look for the presence of four haploid daughter cells, each containing a single set of chromosomes. The chromosomes are typically decondensed.
Tips for Identifying Meiosis Stages on Diagrams
- Chromosome Number: Keep track of the chromosome number throughout the process. The number should halve after Meiosis I and remain the same in Meiosis II.
- Sister Chromatid Attachment: Pay close attention to whether sister chromatids are attached or separated. They separate during Anaphase II but remain joined during Anaphase I.
- Homologous Chromosome Pairing: Look for homologous chromosome pairs (tetrads) during Prophase I and Metaphase I. These pairs are absent in Meiosis II.
- Spindle Fiber Arrangement: Examine the arrangement of spindle fibers. They attach to homologous chromosomes in Meiosis I and individual chromosomes in Meiosis II.
- Cell Number: Remember that Meiosis I produces two cells, and Meiosis II produces four.
By carefully observing these characteristics, you can accurately identify the stages of meiosis on any diagram. Practice makes perfect – the more diagrams you analyze, the more confident you'll become in distinguishing between the phases. Remember to utilize the context provided in the diagram and the labels carefully to achieve accurate identification. Mastering the ability to identify the stages of meiosis on a diagram is a fundamental step in understanding this complex but crucial biological process.
Latest Posts
Latest Posts
-
Draw The Product Of The Reaction
Mar 14, 2025
-
All Of The Following Are Disadvantages Of A Corporation Except
Mar 14, 2025
-
Planning Value If Range Is Givn
Mar 14, 2025
-
All Of The Following Are True Except
Mar 14, 2025
-
Manufacturing Costs Include Direct Materials Direct Labor And
Mar 14, 2025
Related Post
Thank you for visiting our website which covers about Identify The Stages Of Meiosis On The Diagram . We hope the information provided has been useful to you. Feel free to contact us if you have any questions or need further assistance. See you next time and don't miss to bookmark.
