Simultaneously Insert Two Blank Rows Above Row 17
Holbox
Mar 27, 2025 · 5 min read
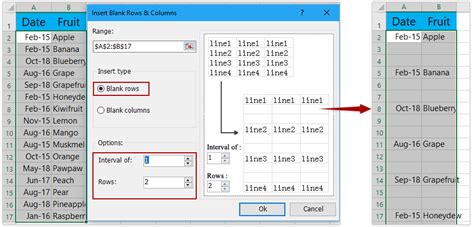
Table of Contents
- Simultaneously Insert Two Blank Rows Above Row 17
- Table of Contents
- Simultaneously Inserting Two Blank Rows Above Row 17: A Comprehensive Guide
- Understanding the Need for Simultaneous Row Insertion
- Method 1: Using the Insert Rows Functionality (Microsoft Excel, Google Sheets, and Others)
- Microsoft Excel:
- Google Sheets:
- Other Spreadsheet Software:
- Method 2: Using Keyboard Shortcuts (For Efficiency)
- Method 3: Using VBA Macros (For Advanced Users and Automation)
- Addressing Potential Challenges
- Best Practices for Maintaining Spreadsheet Integrity
- Conclusion: Choosing the Right Method for You
- Latest Posts
- Latest Posts
- Related Post
Simultaneously Inserting Two Blank Rows Above Row 17: A Comprehensive Guide
Inserting rows in spreadsheet software is a fundamental task, but the need to insert multiple rows simultaneously, especially above a specific row like row 17, requires a slightly different approach. This comprehensive guide will explore various methods for achieving this, covering different software and addressing potential challenges. We'll delve into the specifics, ensuring you can efficiently and accurately insert two blank rows above row 17 in your spreadsheet, regardless of your software of choice.
Understanding the Need for Simultaneous Row Insertion
The need to insert multiple rows simultaneously often arises when working with large datasets or when maintaining a structured spreadsheet. Manually inserting one row at a time can be time-consuming and error-prone, especially when dealing with numerous rows or complex formatting. Inserting two blank rows above row 17, for instance, might be necessary to:
- Maintain consistent spacing: Perhaps you need to add extra space for annotations, summaries, or larger headers above a specific data section starting at row 17.
- Integrate new data: You might need to insert rows to accommodate new data points without disrupting the existing structure and order of your data.
- Improve readability: Adding blank rows can significantly enhance the visual appeal and readability of your spreadsheet, particularly when working with extensive datasets.
- Prepare for calculations or formulas: Inserting blank rows can provide necessary space for formulas or calculations referencing data above and below.
Method 1: Using the Insert Rows Functionality (Microsoft Excel, Google Sheets, and Others)
Most spreadsheet programs offer a straightforward method for inserting rows. The exact steps may vary slightly depending on your software, but the general principle remains the same. Here's how to insert two blank rows simultaneously above row 17 in popular spreadsheet programs:
Microsoft Excel:
- Select Row 17: Click on the row number "17" to select the entire row.
- Right-Click: Right-click on the selected row.
- Insert: Choose the "Insert" option from the context menu.
- Two Rows Inserted: Excel will automatically insert a single row above row 17. Repeat steps 1-3 again to add the second blank row.
Google Sheets:
- Select Row 17: Click on the row number "17" to select the entire row.
- Right-Click: Right-click on the selected row.
- Insert 1 row above: A context menu will appear. Select "Insert 1 row above". This action will add one row. Repeat this procedure to insert a second row. Alternatively, you can follow the same approach as in Microsoft Excel by selecting the row, right-clicking, and selecting "Insert" option to add a single row, then repeat.
Other Spreadsheet Software:
The basic principle remains consistent across most spreadsheet software. Select the target row, right-click, and choose the "Insert" or similar option to add rows above. Consult your software's help documentation for specific instructions if you encounter any difficulty.
Method 2: Using Keyboard Shortcuts (For Efficiency)
Keyboard shortcuts can significantly expedite the process of inserting rows. While the exact shortcuts might slightly vary based on your operating system and spreadsheet program, the underlying principle remains similar. Generally, the following steps are usually effective:
- Select Row 17: Click on row 17.
- Hold Ctrl (or Cmd on Mac): Press and hold down the Ctrl key (or Cmd key on macOS).
- Press Shift + Spacebar (to select the next row): This will select row 17 and the row just below it. Alternatively you can use the up and down arrow keys to select the multiple rows.
- Press Ctrl + "+" (or Cmd + "+" on Mac): This inserts a new row above the selected rows. Repeat this process to get the second blank row.
Note: This method allows you to simultaneously select multiple rows, thereby inserting multiple blank rows in one action. However, it might be easier to repeat the single-row insert steps (Method 1) to get a better grasp on what's happening if this method is confusing.
Method 3: Using VBA Macros (For Advanced Users and Automation)
For advanced users who frequently perform repetitive tasks like inserting multiple rows, Visual Basic for Applications (VBA) macros provide a powerful solution. VBA allows you to automate the process, creating a custom macro that inserts two blank rows above row 17 with a single click.
Here's a sample VBA code for Microsoft Excel:
Sub InsertTwoRowsAbove17()
  Rows(17).EntireRow.Insert Shift:=xlDown
  Rows(17).EntireRow.Insert Shift:=xlDown
End Sub
This code inserts two rows above row 17. You can assign this macro to a button or keyboard shortcut for easy access. Remember that VBA coding requires a basic understanding of programming principles.
Addressing Potential Challenges
While inserting rows is generally straightforward, some challenges may arise:
- Data Loss: Always save your spreadsheet before performing any significant edits. Accidental data loss is a possibility if the process isn't executed correctly.
- Formula Errors: Inserting rows can affect the referencing of cells within formulas. Double-check your formulas after inserting rows to ensure they are still pointing to the correct cells. Absolute references (
$A$1) can help prevent such issues. - Conditional Formatting: Conditional formatting applied to specific rows might need adjustments after inserting new rows.
- Merged Cells: Inserting rows above merged cells can split the merged cells, so take precautions.
Best Practices for Maintaining Spreadsheet Integrity
Maintaining the integrity of your spreadsheet is crucial. Here are some best practices when inserting rows:
- Regularly save your work: Saving frequently minimizes data loss in case of unexpected errors or software crashes.
- Use version control: Consider using version control systems to track changes to your spreadsheet over time.
- Understand formula referencing: Familiarize yourself with absolute and relative cell referencing in formulas to prevent errors when inserting or deleting rows.
- Test your actions: It’s always a good idea to test your actions on a copy of your spreadsheet before making changes to the original.
Conclusion: Choosing the Right Method for You
Inserting two blank rows above row 17 can be achieved through various methods depending on your comfort level and the specific requirements of your task. The simplest methods involve using the built-in "Insert" function or keyboard shortcuts. For repetitive tasks or advanced automation, VBA macros offer a more efficient solution. Regardless of the chosen method, always prioritize the integrity of your spreadsheet by regularly saving your work, understanding formula referencing, and testing any significant edits. Remember to always back up your work before making substantial changes. By following these guidelines, you can ensure seamless row insertion and maintain an organized and efficient spreadsheet.
Latest Posts
Latest Posts
-
The Contribution Margin Equals Sales Minus All
Mar 31, 2025
-
A Salad Bar Attendant Had To Replace
Mar 31, 2025
-
A Supersaturated Solutionn For Nano3 At The Temprature For 50c
Mar 31, 2025
-
Label The Planes Of The Body
Mar 31, 2025
-
Select All The Events Unique To Endochondral Ossification
Mar 31, 2025
Related Post
Thank you for visiting our website which covers about Simultaneously Insert Two Blank Rows Above Row 17 . We hope the information provided has been useful to you. Feel free to contact us if you have any questions or need further assistance. See you next time and don't miss to bookmark.
