Activity 9.3 Topographic Map Construction Answers
Holbox
Mar 27, 2025 · 6 min read
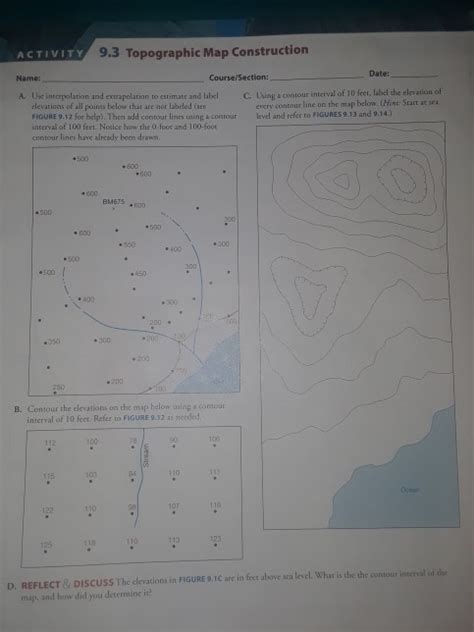
Table of Contents
- Activity 9.3 Topographic Map Construction Answers
- Table of Contents
- Activity 9.3 Topographic Map Construction: A Comprehensive Guide
- Understanding Topographic Maps: The Foundation
- Key Elements of a Topographic Map:
- Deconstructing Activity 9.3: A Step-by-Step Approach
- Step 1: Analyze the Data
- Step 2: Determine the Contour Interval
- Step 3: Identify the Index Contours
- Step 4: Interpolation and Contour Line Drawing
- Step 5: Add Map Elements
- Step 6: Review and Refine
- Common Challenges and Troubleshooting
- Advanced Techniques and Considerations
- Conclusion: Mastering Topographic Map Construction
- Latest Posts
- Latest Posts
- Related Post
Activity 9.3 Topographic Map Construction: A Comprehensive Guide
Creating a topographic map is a fundamental skill in geography and earth science. Activity 9.3, often found in educational materials, typically involves constructing a topographic map from given data, such as contour lines or elevation points. This comprehensive guide will delve into the intricacies of this activity, providing a detailed explanation of the process, common challenges, and advanced techniques to ensure accuracy and understanding. We'll explore the underlying principles and offer solutions to help you master topographic map construction.
Understanding Topographic Maps: The Foundation
Before diving into the construction process, it's crucial to grasp the fundamental principles of topographic maps. These maps represent the three-dimensional shape of the Earth's surface on a two-dimensional plane using contour lines. Contour lines connect points of equal elevation. The closer these lines are together, the steeper the slope; the farther apart, the gentler the slope.
Key Elements of a Topographic Map:
- Contour Lines: The core element, showing elevation changes.
- Contour Interval: The vertical distance between consecutive contour lines. This is a crucial piece of information provided in the activity and is critical for accurate map construction.
- Index Contours: Thicker lines, usually labeled with their elevation, making it easier to read the map.
- Supplementary Contours: Lines added between index contours to provide more detail in areas of subtle elevation change.
- Scale: The ratio between the map distance and the actual ground distance. This allows for accurate measurement of distances on the map.
- Relief: The difference in elevation between the highest and lowest points on the map. Understanding relief helps interpret the overall topography.
Deconstructing Activity 9.3: A Step-by-Step Approach
Activity 9.3, depending on the specific instructions, may present you with various types of data:
- Elevation Points: Individual points with assigned elevations. You'll need to interpolate contour lines between these points.
- Pre-drawn Contour Lines (Incomplete): You might be given a partial topographic map and need to complete the contour lines based on existing data and logical inferences about the terrain.
- Profile Data: A cross-section showing elevation changes along a specific line. This data can be used to infer the shape of contour lines.
Let's assume a typical scenario where you're given a grid of elevation points. Here's a breakdown of the steps involved in constructing your topographic map:
Step 1: Analyze the Data
Carefully examine the provided elevation points. Identify the highest and lowest points to establish the range of elevations. Note the distribution of points; are they evenly spaced? Understanding the data distribution will guide your interpolation.
Step 2: Determine the Contour Interval
The contour interval is usually provided in the activity instructions. This is the vertical distance between consecutive contour lines. For example, a contour interval of 10 meters means each contour line represents a 10-meter change in elevation.
Step 3: Identify the Index Contours
Based on the contour interval and the range of elevations, determine which contour lines will be index contours. These are typically every 5th or 10th contour line, depending on the map scale and complexity.
Step 4: Interpolation and Contour Line Drawing
This is the most critical step. You need to interpolate the contour lines between the elevation points. This involves visually estimating the location of points with intermediate elevations.
Several techniques can be employed:
- Linear Interpolation: The simplest method, assuming a straight-line change in elevation between two points. Suitable for gentle slopes.
- Cubic Interpolation: More advanced, considering the curvature of the terrain. Better suited for areas with complex topography.
- Spatial Interpolation: Uses advanced algorithms (often found in GIS software) to estimate values at unsampled locations. This method offers higher accuracy, particularly when working with a large dataset.
Practical Tips for Interpolation:
- Start with the Index Contours: It's often easier to start with the index contours and then interpolate the intermediate contours.
- Use a Smooth Hand: Avoid sharp, jagged lines. Contour lines should generally follow a smooth, flowing pattern reflecting the natural terrain.
- Consider the Terrain: Think about realistic landforms. Contour lines should logically reflect hills, valleys, ridges, and other terrain features.
- Check for Consistency: Ensure that contour lines don't cross each other (unless representing an overhanging cliff, which is unlikely in most educational exercises).
Step 5: Add Map Elements
Once the contour lines are drawn, add other essential map elements:
- Title: Clearly indicate the title of the topographic map.
- Scale: Include the map scale to indicate the ratio between the map and the real world.
- North Arrow: Orient the map, showing north direction.
- Legend: Explain any symbols or abbreviations used on the map.
Step 6: Review and Refine
Thoroughly review your completed topographic map. Ensure that the contour lines are smooth, logically placed, and accurately reflect the provided elevation data. Make any necessary revisions to improve the accuracy and clarity of your map.
Common Challenges and Troubleshooting
Constructing accurate topographic maps can be challenging. Here are some common issues and how to overcome them:
- Unevenly Spaced Data Points: If data points are unevenly distributed, interpolation becomes more difficult. Use a combination of linear and cubic interpolation techniques, or consider using spatial interpolation methods for higher accuracy.
- Ambiguous Data: In some cases, the provided data may not be entirely clear, leading to uncertainty in contour line placement. In such situations, make reasonable inferences based on the overall terrain pattern and neighbouring data points. Clearly document any assumptions made.
- Steep Slopes: Steep slopes require careful attention to detail during interpolation. Use a smaller contour interval in areas with significant elevation changes to accurately represent the slope.
Advanced Techniques and Considerations
For more advanced topographic map construction, consider these techniques:
- Digital Elevation Models (DEMs): DEMs are digital representations of the Earth's surface. Software packages can use DEMs to automatically generate contour lines, offering a more accurate and efficient approach.
- Geographic Information Systems (GIS): GIS software provides powerful tools for creating, analyzing, and manipulating topographic maps. GIS software offers sophisticated interpolation techniques and visualization capabilities.
- Understanding Landforms: Familiarity with different landforms (hills, valleys, ridges, saddles) will help you interpret the data and draw more accurate contour lines.
Conclusion: Mastering Topographic Map Construction
Activity 9.3, while seemingly straightforward, presents a valuable opportunity to develop crucial skills in data interpretation, spatial reasoning, and map creation. By understanding the fundamental principles, employing appropriate interpolation techniques, and paying close attention to detail, you can create accurate and informative topographic maps. Remember to meticulously review your work and make necessary revisions to enhance the clarity and accuracy of your final product. This comprehensive guide provides the knowledge and strategies necessary to confidently tackle this activity and achieve success in understanding topographic map construction. Through practice and careful attention to detail, you can master this important skill and effectively communicate complex geographical information.
Latest Posts
Latest Posts
-
A Salad Bar Attendant Had To Replace
Mar 31, 2025
-
A Supersaturated Solutionn For Nano3 At The Temprature For 50c
Mar 31, 2025
-
Label The Planes Of The Body
Mar 31, 2025
-
Select All The Events Unique To Endochondral Ossification
Mar 31, 2025
-
All Of The Following Are Anxiety Disorders Except
Mar 31, 2025
Related Post
Thank you for visiting our website which covers about Activity 9.3 Topographic Map Construction Answers . We hope the information provided has been useful to you. Feel free to contact us if you have any questions or need further assistance. See you next time and don't miss to bookmark.
